

Issue:
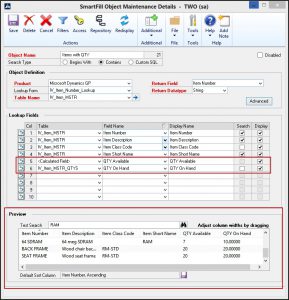
You would like the Items Object to also show the QTY on Hand.
![]()
Recommendation:
-
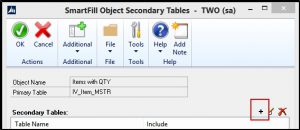
- Go to SmartFill | Objects.
- Double-click on the Items Object to open the Object Maintenance window.
- Next to the Table Name, click the blue expansion arrow to open the SmartFill Object Secondary Tables window.
- Click on the [+] button next to Secondary Tables.
-
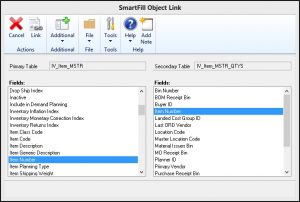
- In the SmartFill Tables window, locate and highlight the IV_Item_MSTR_QTYS table. Click Select.
- In the SmartFill Object Link window you will see two Field Lists. This is where you will make the link between the two tables.
- Highlight ‘Item Number’ in both lists and click the Link button.
-
- Next, be sure you click OK to save the changes.
- In the Object Maintenance window, click on the Filters button.
- On the first line, enter the following information in:
- Table Name: IV_Item_MSTR_QTYS
- Table Field: Record Type
- Operation: Equals
- Value: 1
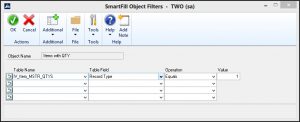
- Then, click OK to save changes in the Object Filters window.
- In the Lookup Fields area of the Object Maintenance window, click the Table drop down arrow on an empty line and select Calculated Field.
- Then, click the drop down for Field Name and select New Calculated Field.
- The Object Calculated Field window will open where you will fill in the following:
- Give the Calculated Field a name, such as QTY Available
- Choose a Display Name, such as QTY Available.
- Set the Datatype as Number.
- Select ‘Number (no decimals)’ for the Format As field.
- Enter the following for the first line:
- Type: Table Field
- Table Name: IV_Item_MSTR_QTYS
- Field Name: QTY on Hand
- Operation: Subtraction
- Enter the following for the second line:
- Type: Table Field
- Table Name: IV_Item_MSTR_QTYS
- Field Name: QTY Allocated
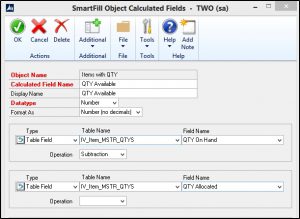
- Then, press OK to save the changes.
- Be sure to mark the Display checkbox next to the newly created Calculated Field. You can also add in the QTY on Hand, which is shown below.
- When you are finished, be sure you save all changes.
- Finally, close and reopen any Dynamics GP windows that were open so that SmartFill can refresh.
If you have questions or any issues with this setup, please reach out to our Support team!