Subject
The steps here explain how to use the Process Rebates function within Rockton Pricing Management (RPM) and Acumatica.
Resolution
Rebates are a great incentive program, but they come with manual processes. The Rebate Management (Process Rebates) function allows you to easily setup, track, and accurately pay out rebate transactions for Customers. There are numerous ways to calculate rebates using RPM, but you can also use the Process Rebates screen for commissions, royalties, monthly fees and more.
In this example, there is a computer electronics store offering a 1% rebate to customers who purchase a laptop in the month of August. To accomplish this, create a Price Calculation within RPM to calculate the rebate amount. Next, assign this Price Calculation to the Price Schedule. When you create an invoice in Acumatica using that Price Schedule, RPM will automatically calculate and track the rebate amount. The “Process Rebates” function in Acumatica can then be used to facilitate the reimbursement of the calculated rebate value.
Follow the steps below to process a rebate.
Create Price Calculation
Create a Price Calculation for the 1% rebate for computer purchases.
- In RPM, expand the Pricing menu and click Price Calculations.
- Click Add New.
- Enter a Price Calculation Name, such as Laptop Rebate – August.
- Select the Price Mode Option for the calculation. For this example, Percent Adjustment.
- Enter the Amount or Percent based on the Price Mode selected. For this example, enter 1.0
- Do no mark Modify Unit Price since our example is to pay out the rebate to the customer later.
- From the Tracking tab, mark the Track as Extended Price Adjustments check box. If this is marked, a 1% rebate is offered for each laptop sold rather than the first one.
- Mark the Track Adjustments check box.
- Select a Debit GL Account and a Credit GL Account.
- Mark the User Can Edit check box if you want to be able to change the rebate amount after it has been calculated on a transaction.
- Click Save & Close.
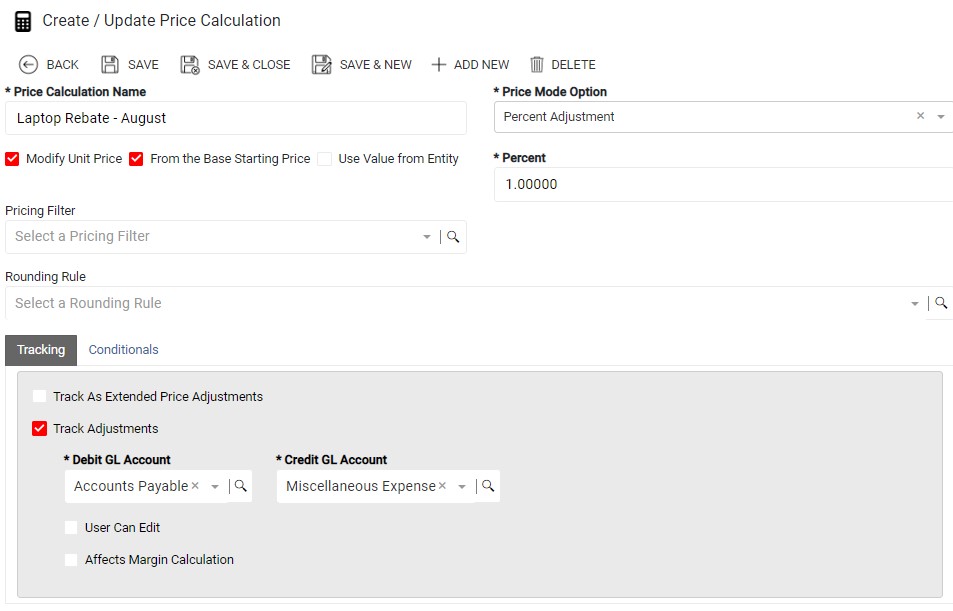
Note: You can also create a Pricing Filter to assign to the Price Calculation encompassing any date ranges or Item information in which to filter the rebates. This filter can be assigned to the Price Calculation or the Price Schedule.
Assign to a Price Schedule
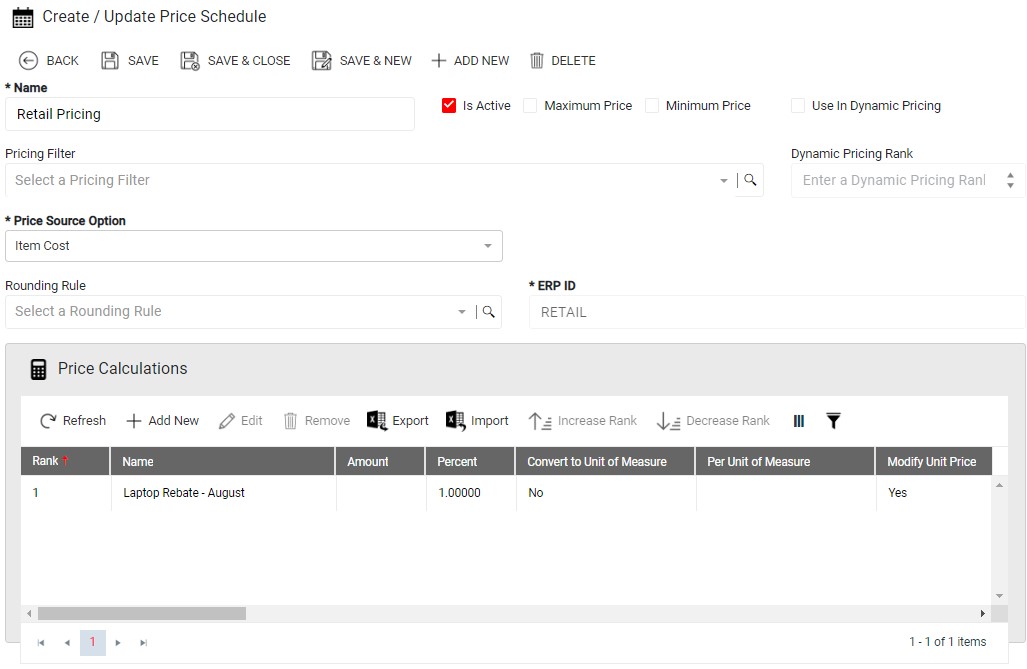
This example assumes you have a Price Schedule already created.
- In RPM, expand the Pricing menu and click Price Schedules.
- Select a Price Schedule where you wish to assign the Price Calculation and click Edit.
- In the Price Calculations grid, select Add New.
- Highlight the Price Calculation created in the previous steps and click Select.
- Click Save & Close.
Process an Invoice in Acumatica
- In Acumatica, go to Sales Orders and then click Invoices.
- Click New Record (+).
- Select a Customer.
- In the Details section, click Add Row (+) to add line detail.
- Enter an Inventory ID on the line.
- Enter Qty of 1.
- Click Save.
- From the Details section Switch Between Grid and Form (pencil icon) to see the line detail. Notice the Laptop Rebate was computed.
- Click Release.
- On the more menu (…), click Pay, and then click Release.
Process Rebates in Acumatica
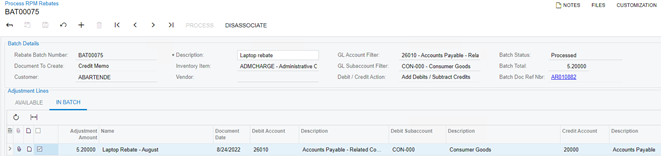
- In Acumatica, go to Receivables or Payables and click Process Rebates or use the Search and type Process Rebates.
- Click New Record (+).
- In the Document to Create, select a Document Type from the drop-down. In this example, credit the Customer so select Credit Memo.
- Select Customer to credit.
- Enter a Description.
- Select an Inventory Item to process the rebate against.
- Enter or select the GL Account Filter used for the rebate price calculation.
- Select the appropriate Debit / Credit Action.
- From the Adjustment Lines section, view the rebate values available for selection based on the criteria entered on the rebate batch.
- Select the necessary lines. They will disappear from the Available section and move to the In Batch section.
- View the In Batch tab to see the rebate values that will be part of the batch before processing.
- Click Save.
- Click Process.
After the operation is complete, notice the Batch Doc Ref Nbr field populates with a direct link to the document created. You can process the linked document through normal business processes.