

Subject:The steps here describe how to set up Dynamics Report Manager (DRM) to email and print specific Sales Invoice reports to different customers.
Resolution:
Here are the steps on how to set up the 3 Reports, 3 Batch Reports, and 1 Launch Point in DRM.
Customer Setup:
In this example, we are using two Sales Invoice Reports and there are three customers with different needs. Customer AARONFIT0001 needs Invoice 1 emailed, Customer ADAMPARK0001 needs Invoice 2 emailed, and Customer BERRYMED0001 needs Invoice 1 printed. In the Customer Maintenance window, the customers have the following values entered (see screenshots below).
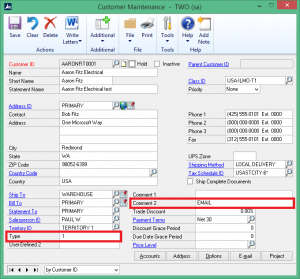
Customer AARONFIT0001
User Defined 1: 1
Comment 2: Email
Customer ADAMPARK0001
User Defined 1: 2
Comment 2: Email
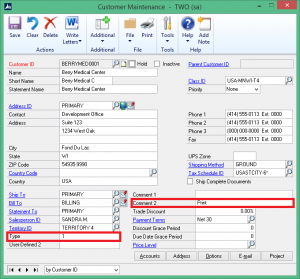
Customer BERRYMED0001
User Defined 1: 1
Comment 2: Print
Note: If a Customer needs both an email and a printed copy of the Invoice, you can change the Where clause in the Data tab of the Batch Report as appropriate.

Adding a Report to email the report:
- Go to Reports | Dynamics Report Manager | Dynamics Report Manager Explorer.
- In the Dynamics Report Manager Explorer window, click the Reports tab, and then click the Add Report button.
- In the Add Report window, mark Enter Manually, select the Report Type of Crystal Report, and then click OK.
- In the Report Maintenance window:
- Click the Technical Name Folder button to browse to the location of your report and select it.
- Enter a Display Name for the report.
- Click the Parameters tab.
- Click the Add Parameters button.
- Click Import and then click Import again to add the parameters currently on the Crystal Report.
- Or, you can click Manual to manually add a parameter to the report.
- Click the Destination tab.
- Select File for Destination.
- To modify the name of the file, click the Output File Path and Name Builder button.
- In the Output Filename Builder window, place your cursor in front or after Report. Note: You can delete Report in the Filename or keep it.
- In the Insert Tokens section, select which Tokens you would like to add to the name of the file. After you add a Token, move your cursor in front or behind the Token to add another one.
- Click OK.
- Click Access tab and verify the appropriate access is selected.
- Click the Connection tab and verify the appropriate settings are selected.
- Click the Destination tab.
- Select Printer for Destination.
- Select the appropriate Printer Settings and Printer Orientation.
- Click OK.
- Click the Access tab and verify the appropriate access is selected.
- Click the Connection tab and verify the appropriate settings are selected.
- Click the Reports tab.
- Click the + button to add the Batch Report you created in Step 15b.
- Repeat Step 21d to add the Batch Report you created in Step 15x.
- Repeat Step 21d to add the Batch Report you created in Step 18b.
- Click the Access tab and verify the appropriate access is selected.
- Click the Actions tab.
- Click the Add Custom Actions button.
- In the Custom Actions column, select Set Parameter to Field.
- In the Action Settings section, select the following:
Report: Select the first report in the list.
Parameter: Batch Number
Product: Microsoft Dynamics GP
Series: Sales
Form: Sales Batch Entry
Window: Sales Batch Entry
Field: Batch Number - Click OK.
- Click the Add Custom Actions button.
- In the Custom Actions column, select Insert Before/After Breakpoint.
- Click OK.
- Click the Add Custom Actions button.
- In the Custom Actions column, select Run Field Script.
- In the Action Settings section, select the following:
Product: Microsoft Dynamics GP.
Series: Sales
Form: Sales Document Print Options
Window: Sales Document Print Options
Field: Cancel Button - Click OK.
- Click the Add Custom Actions button.
- In the Custom Actions column, select Launch Specific Report.
- In the Action Settings section, select the following:
Report: Select the first report in the list. - Click OK.
- Click the Add Custom Actions button.
- In the Custom Actions column, select Set Parameter to Field.
- In the Action Settings section, select the following:
Report: Select the second report in the list.
Parameter: Batch Number
Product: Microsoft Dynamics GP
Series: Sales
Form: Sales Batch Entry
Window: Sales Batch Entry
Field: Batch Number - Click OK.
- Click the Add Custom Actions button.
- In the Custom Actions column, select Launch Specific Report.
- In the Action Settings section, select the following:
Report: Select the first report in the list. - Click OK.
- Click Save.
- Repeat Steps 2 – 6 to add another Report to be emailed.
- Adding a Report to print the report:
- Go to Reports | Dynamics Report Manager | Dynamics Report Manager Explorer.
- In the Dynamics Report Manager Explorer window, click the Reports tab, and then click the Add Report button.
- In the Add Report window, mark Enter Manually, select the Report Type of Crystal Report, and then click OK.
- In the Report Maintenance window:
- Click the Technical Name Folder button to browse to the location of your report and select it.
- Enter a Display Name for the report.
- Click the Parameters tab.
- Click the Add Parameter button.
- Click Import and then click Import again to add the parameters currently on the Crystal Report.
- Or, you can click Manual to manually add a parameter to the report.
- Click Save.
- Repeat Steps 7-11 to add another Report to be printed.Adding a Batch Report to email the report:
- In the Dynamics Report Manager Explorer window, click the Reports tab, and then click the Add Report button.
- In the Add Report window, mark Use Wizard, and then click OK.
- In the Batch Report Wizard Welcome window:
- Click Next.
- Mark the checkbox in front of the Display Name you entered in step 4b above, and then click Next.
- Click Next.
- In the Search field, enter the name of the report’s main table, and then click the Binoculars button. In this example, it is the Sales Transaction Work table.
- Mark the Sales Transaction Work for Microsoft Dynamics GP table, and then click Next.
- Link the parameter(s) to a field in the main table. If a parameter is for a field in another table, click the Link Tables button to link another table. (See Steps 15i – n below for details on linking a table.)
- Click Next.
- Specify the Batch Number Filter field from the Sales Transaction Entry window, and then click Next.
- Click the Link Tables button.
- In the DRM Linked Tables window, click the Add Link button.
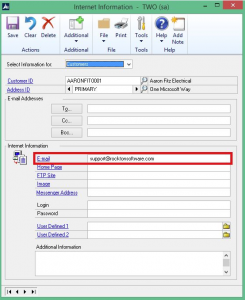
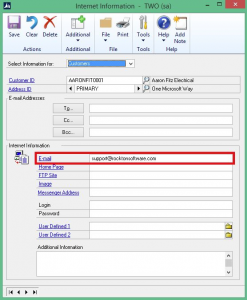
- In the DRM Tables window, select Company for Series, enter Internet for Find and click the Binoculars button, select Internet Addresses, and then click Select.
- In the DRM Linked Tables window, select Customer Number in the Sales Transaction Work column, select Master ID in the Internet Addresses column, and then click Link.
- Repeat step 15j to link another table.
- In the DRM Linked Tables window, click OK.
- In the Batch Report Wizard window, select the Internet Addresses table.
- Select INet1 and click the Assign table field to To address button, and then click Next.
- Enter a Subject and Message, and then click Next.
- Enter a display name in the Batch Report Description field, and then click Next.
- Click Next.
- Click Finish.
- In the Batch Report Maintenance window, click the Data tab. Here is an example of what you will see.
SELECT*Note: TWO should be replaced with your specific Company ID.
ISNULL(b.INET1, '')[INet1],
ISNULL(a.SOPNUMBE, '') [SOP_Number],
ISNULL(a.SOPTYPE, '') [SOP_Type]
FROM TWO..SOP10100 a
LEFT OUTER JOIN TWO..SY01200 b
ON (a.CUSTNMBR = b.Master_ID)
WHERE
ISNULL('%PARAM1%', '') = a.BACHNUMB - In this example, I would like to manually link the RM00101 (Customer Master) table and then add a restriction based on the Customer Maintenance window User Defined 1 field beginning with a value of 1 and Comment 2 beginning with a value of E. Here is an example of what it would look like:
SELECT*Note: TWO should be replaced with your specific Company ID.
ISNULL(a.CNTCPRSN, '') [Contact_Person],
ISNULL(b.INET1, '') [INet1],
ISNULL(a.SOPNUMBE, '') [SOP_Number],
ISNULL(a.SOPTYPE, '') [SOP_Type],
ISNULL(a.BACHNUMB,'') [Batch_Number],
ISNULL(c.USERDEF1,'') [User_Defined_1]
FROM TWO..SOP10100 a
LEFT OUTER JOIN TWO..SY01200 b
ON (a.CUSTNMBR = b.Master_ID)
LEFT OUTER JOIN TWO..RM00101 c
ON (a.CUSTNMBR = c.CUSTNMBR)
WHERE
ISNULL('%PARAM1%', '') = a.BACHNUMB
and c.USERDEF1 like '1%' and c.COMMENT2 like 'E%' - Click Save.
- Repeat Steps 13 – 15 to add another Batch Report for the next Report you created in Step 4b. Important notes:
- In Step 13b, choose the new Report you created in Step 4b.
- In Step 13v, I changed my restriction to be based on the Customer Maintenance window User Defined 1 field beginning with a value of 2.
Adding a Batch Report to print the report:
- In the Dynamics Report Manager Explorer window, click the Reports tab, and then click the Add Report button.
- In the Add Report window, mark Use Wizard, and then click OK.
- In the Batch Report Wizard Welcome window:
- Click Next.
- Mark the checkbox in front of the Display Name you entered in step 10b above, and then click Next.
- Select No for the Do you intend to have the reports emailed? field, and then click Next.
- In the Search field, enter the name of the report’s main table, and then click the Binoculars button. In this example, it is the Sales Transaction Work table.
- Mark the Sales Transaction Work for Microsoft Dynamics GP table, and then click Next.
- Link the parameter(s) to a field in the main table. If a parameter is for a field in another table, click the Link Tables button to link another table. (See Steps 18i – n below for details on linking a table.)
- Click Next.
- Specify the Batch Number Filter field from the Sales Transaction Entry window, and then click Next.
- Click the Link Tables button.
- In the DRM Linked Tables window, click the Add Link button.
- In the DRM Tables window, select Company for Series, enter Internet for Find and click the Binoculars button, select Internet Addresses, and then click Select.
- In the DRM Linked Tables window, select Customer Number in the Sales Transaction Work column, select Master ID in the Internet Addresses column, and then click Link.
- Repeat step 18j to link another table.
- In the DRM Linked Tables window, click OK.
- In the Batch Report Wizard window, select the Internet Addresses table.
- Select INet1 and click the Assign table field to To address button, and then click Next.
- Enter a Subject and Message, and then click Next.
- Enter a display name in the Batch Report Description field, and then click Next.
- Click Next.
- Click Finish.
- In the Batch Report Maintenance window, click the Data tab. Here is an example of what you will see.
SELECT*Note: TWO should be replaced with your specific Company ID.
ISNULL(b.INET1, '') [INet1],
ISNULL(a.SOPNUMBE, '') [SOP_Number],
ISNULL(a.SOPTYPE, '') [SOP_Type]
FROM TWO..SOP10100 a
LEFT OUTER JOIN TWO..SY01200 b
ON (a.CUSTNMBR = b.Master_ID)
WHERE
ISNULL('%PARAM1%', '') = a.BACHNUMB - In this example, I would like to manually link the RM00101 (Customer Master) table and then add a restriction based on the Customer Maintenance window Comment 2 field beginning with a value of P. Here is an example of what it would look like:
SELECT*Note: TWO should be replaced with your specific Company ID.
ISNULL(a.CNTCPRSN, '') [Contact_Person],
ISNULL(b.INET1, '') [INet1],
ISNULL(a.SOPNUMBE, '') [SOP_Number],
ISNULL(a.SOPTYPE, '') [SOP_Type],
ISNULL(a.BACHNUMB,'') [Batch_Numbeer],
ISNULL(c.USERDEF1,'') [User_Defined_1]
FROM TWO..SOP10100 a
LEFT OUTER JOIN TWO..SY01200 b
ON (a.CUSTNMBR = b.Master_ID)
LEFT OUTER JOIN TWO..RM00101 c
ON (a.CUSTNMBR = c.CUSTNMBR)
WHERE
ISNULL('%PARAM1%', '') = a.BACHNUMB
and c.USERDEF1 like '1%' and c.COMMENT2 like 'P%' - Click Save.
- Repeat Steps 16 – 18 to add another Batch Report for the new Report you created in Step 10b. Important notes:
- In Step 18b, choose the new Report you created in Step 10b.
- In Step 18v, change the restriction as appropriate.Adding a Launch Point:
- In the Dynamics Report Manager Explorer window, click the Launch Points tab, and then click the Add Launch Point button.
- In the Add Launch Point window, mark Enter Manually, select Window Field or Button for Launch Point Type, and then click OK.
- In the Launch Point Maintenance window:
- Enter a Name for the Launch Point.
- Click the Settings tab and select the following:
Trigger Type: Window Print Menu
Attach Type: Before and After original script
Product: Microsoft Dynamics GP
Series: Sales
Form: Sales Batch Entry
Window: Sales Batch Entry - Click the Reports tab.
- Click the + button to add the Batch Report you created in Step 15b.
- Repeat Step 21d to add the Batch Report you created in Step 15x.
- Repeat Step 21d to add the Batch Report you created in Step 18b.
- Click the Access tab and verify the appropriate access is selected.
- Click the Actions tab.
- Click the Add Custom Actions button.
- In the Custom Actions column, select Set Parameter to Field.
- In the Action Settings section, select the following:
Report: Select the first report in the list.
Parameter: Batch Number
Product: Microsoft Dynamics GP
Series: Sales
Form: Sales Batch Entry
Window: Sales Batch Entry
Field: Batch Number. - Click OK.
- Click the Add Custom Actions button.
- In the Custom Actions column, select Insert Before/After Breakpoint.
- Click OK.
- Click the Add Custom Actions button.
- In the Custom Actions column, select Run Field Script.
- In the Action Settings section, select the following:
Product: Microsoft Dynamics GP
Series: Sales
Form: Sales Document Print Options
Window: Sales Document Print Options
Field: Cancel Button. - Click OK.
- Click the Add Custom Actions button.
- In the Custom Actions column, select Launch Specific Report.
- In the Action Settings section, select the following:
Report: Select the first report in the list. - Click OK.
- Click the Add Custom Actions button.
- In the Custom Actions column, select Set Parameter to Field.
- In the Action Settings section, select the following:
Report: Select the second report in the list.
Parameter: Batch Number
Product: Microsoft Dynamics GP
Series: Sales
Form: Sales Batch Entry
Window: Sales Batch Entry
Field: Batch Number. - Click OK.
- Click the Add Custom Actions button.
- In the Custom Actions column, select Launch Specific Report.
- In the Action Settings section, select the following:
Report: Select the second report in the list. - Click OK.
- Click Save.