


During a recent Deep Dive webinar, we dug into new functionality for the User Lockout feature in the Dynamics GP Toolbox, walked through how to setup email notifications on specific and individual changes using Auditor, and stepped through how to look up Intercompany GL Accounts in SmartFill. If you missed it, give it a watch right here, or keep reading!
Dynamics GP Toolbox
Our Dynamics GP Toolbox product is a compilation of 27 tools to help make your work simpler & easier®. Recently we made a change to an existing tool called User Lockout. It allows you to lock out a user in GP after they have made a specific number of unsuccessful attempts to log in. That specific number was hard coded to three attempts in past versions, but the change allows you to set the number of incorrect login attempts. You can choose a number from 1-9. For example, if you set it to the number 2, and your user tries to log into GP, but types their password incorrectly, they will get one more chance to try it before receiving this message:
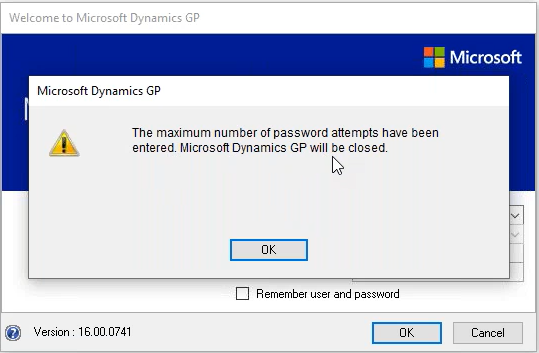
The message above indicates they have tried their password more than the maximum number of attempts you have allowed. While GP allows the user to keep launching GP and trying passwords, User Lockout requires the administrator to unlock the user once this message is received.
One note to remember, if you disable the User Lockout tool, and have users who are currently locked out, you will receive this warning message:
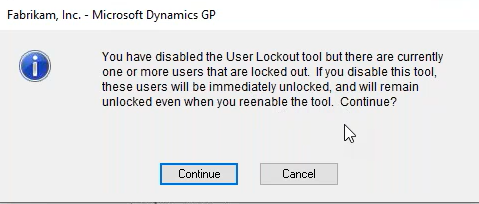
This explains that the user who is locked out will have access again once you disable this tool.
Auditor
Auditor is very useful for many reasons including preventing fraud, knowing when a change is made and why, and using the e-Sign Signatures feature to prevent users from making a change without approval from an E-Sign Administrator.
One of the best things about Auditor are the notifications. Especially the ability to email the notification. To do this, you need to make a change in two different places within Auditor.
- Auditor System Settings – here you see all the users you have setup within Microsoft Dynamics GP. In this window, for those users marked as Auditor Administrators, mark the ‘email’ checkbox under the Audit Notify Options column, then click the line expansion (blue arrows) to allow you to enter the appropriate email addresses. The users marked to email receive an email notification when an audit is captured for those audits you marked to notify.

- Mark Audit to notify – go to the Audit itself and mark the specific field where you would like to receive an email notification when a change is made. For my example, we will use a Table Audit. The steps to make this change are:
-
- Click Microsoft Dynamics GP | Tools | Setup | Auditor | Audit Groups, then select the Audit Group that contains the table audit where you are adding an email notification.
- Highlight the table audit and click Edit to open the Auditor Table Maintenance window.
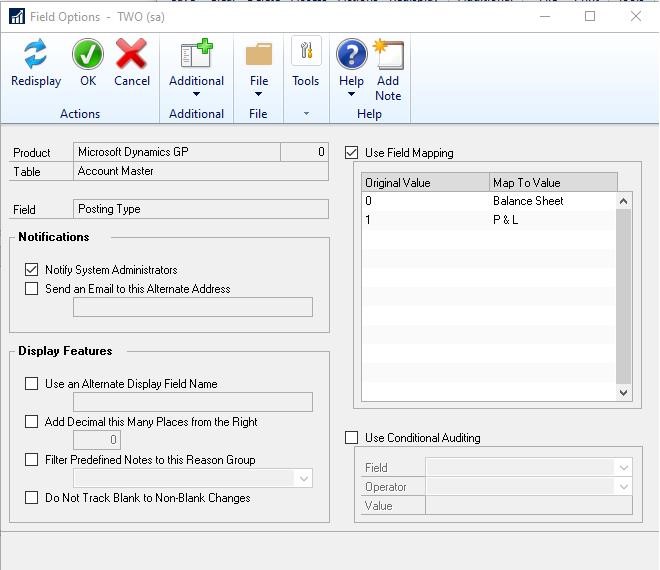
- In the field list, highlight the field where you want to add the email notification, and click Field Options (the radio button in the blue section above the Options column). Keep in mind this setting will apply to this field only.
- Under the Notifications section, check the box to ‘Notify System Administrators’.
Note: You can also choose to ‘Send an Email to this Alternate Address’, if you want to send the notification to someone not marked as an Auditor Administrator. For multiple recipients, you need to use an email group as you cannot add multiple email addresses in this field. - Click OK to close the window and close the remaining windows.
Now, when you make a change to the field you have set up to notify, you will receive an email that shows the changes and the other pertinent Auditor information related to that audit.
If you have issues with notifications and find they are not being sent, there is a great KB article on troubleshooting:
Auditor isn’t Displaying Audits in Message Center or Sending Notifications
SmartFill
Our SmartFill product allows you to find a specific Account, Vendor, Customer, Employee, and other key Master Records with ease and flexibility. For example, you can find a Customer ID by phone number, contact name, or any other information you have saved on that record, as long as you have the SmartFill Object setup to allow you to search using that field. You can even link other tables!
With SmartFill, you can also use a Custom SQL Object to allow you to search for General Ledger Accounts from another GP company when you are entering an Intercompany transaction.
To setup this SmartFill Object to lookup Intercompany GL Accounts, you will need to create a new SmartFill Object called ‘Intercompany Accounts’. This object will differ from a typical Accounts object in that it will use a datatype of String, instead of Account as shown below:
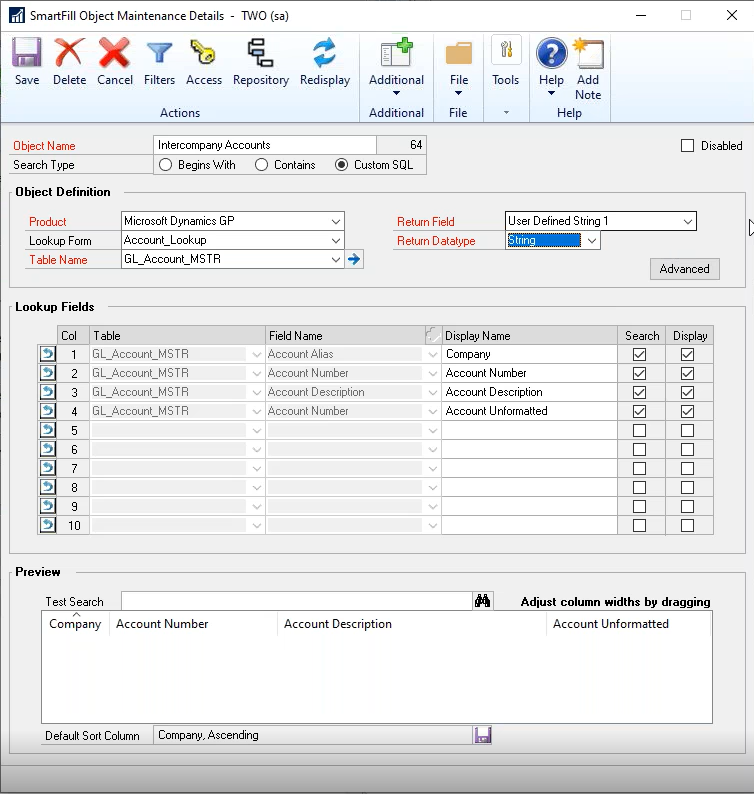
In the example, the fields setup includes Company, even though it is not used as a search field. It is important to mark the Search box, so the stored procedure can use it as a parameter to identify the company you are using in your Intercompany transaction.
Note: The Test Search feature is not available when you use Custom SQL as your Search Type.
You will also need to either edit your SmartFill stored procedure in SQL Server Management Studio to include the new object called ‘Intercompany Accounts’ or create the stored procedure for the first time.
The steps to edit the script and create the SmartFill Repository record to link the object to the field on the window within GP are included in our Knowledgebase article: How to Use SmartFill to Lookup Intercompany General Ledger Accounts.
As you go through the steps and you have any issues or questions, please reach out to our support team at support@rocktonsoftware.com.


