
Subject
The steps here explain how to create Pricing Filters in Rockton Pricing Management (RPM) for prices in a specific date range and schedule price changes to automatically take effect when needed.
RPM enables you to create price changes ahead of time, but also gives you control as to when those price changes go into effect. You can make your price changes when you want and in advance if desired. Using Pricing Filters allows you to create and perfect pricing ahead of time and have the new pricing start on an exact date.
This is a good option if every item is increasing by the same amount or percent. For example, increasing the prices $10 or 10% over the prior year prices. To accomplish this, create a Pricing Filter using the date range for the price increase. Then, create a Price Calculation for the adjustment amount with the Pricing Filter assigned. Lastly, assign that Price Calculation to a new or existing Price Schedule. This allows pricing to continue, but once the appropriate date is reached, new pricing automatically computes.
Note: This article explains how to use Pricing Filters on Price Calculations to drive pricing based on date. If you use Price Books and want date driven pricing, see KB Article Using Date Driven Pricing on Price Sheets in Rockton Pricing Management.
Resolution
In the example below, you are working on pricing for the year 2024. You are increasing the price of all items 12% over the 2023 pricing. Since the price is changing across all items, you can use the prior year Price Schedule setup. In addition, create a Pricing Filter for the 2024 year and assign that Pricing Filter to a Price Calculation which will increase an item price once the effective date begins.
Create Pricing Filter
- From the Pricing menu, click Pricing Filters.
- Click Add New.
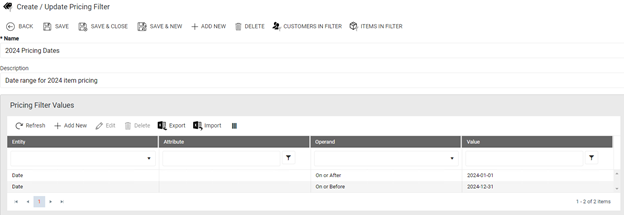
- Enter a Pricing Filter Name. In this example, we’ve entered 2024 Pricing Dates.
- Enter a Description if desired.
- Click Save.
- Click Add New from the Pricing Filter Values grid.
- From the Entity drop-down field, select Date.
- From the Operand drop-down field, select On or After.
- In the Value field, enter the date the pricing should start. In this example, we entered 01/01/2024.
- Click Save.
- Click Add New from the Pricing Filter Values grid.
- From the Entity drop-down field, select Date.
- From the Operand drop-down field, select On or Before.
- In the Value field, enter the date the pricing should end. In this example, we entered 12/31/2024.
- Click Save.
Create Price Calculation
- From the Pricing menu, click Price Calculations.
- Click Add New.
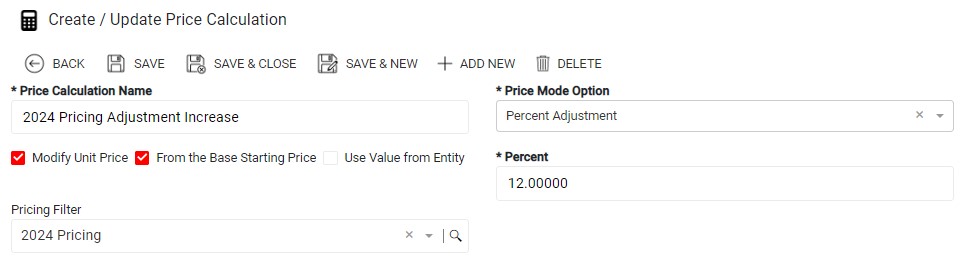
- Enter a Price Calculation Name. In this example, we used 2024 Pricing Adjustment Increase.
- From the Price Mode Option drop-down, select Percent Adjustment or the mode you wish to use.
- Enter the Percent amount. In this example, we entered 12.
- Mark the Modify Unit Price checkbox.
- Mark the From the Base Starting Price checkbox.
- Select the Pricing Filter from the lookup. In this example, we selected 2024 Pricing Dates created earlier.
- Optional: Make any additional changes desired to the calculation: Rounding Rules, Track Adjustments, etc.
- Click Save.
Add to Price Schedule
- From the Pricing menu, click Price Schedules.
- Select the existing pricing schedule used for current year pricing and click Edit.
- Click Add New from the Price Calculations grid.
- Select the Price Calculation created earlier. In this example, we selected 2024 Pricing Adjustment Increase.
- Click Save.
At this point, the setup is complete in RPM. Pricing transactions can be entered as normal in the ERP. When the date of the transaction falls within the date filter range, the additional price calculation will compute and add the additional 12%.