Subject
This article describes how to set up pricing in RPM to accommodate changes to entity values. For example, you may have discounts or markups for customers that are negotiated but change periodically. The “Use Value from Entity” option allows a Price Calculation to easily calculate based on an existing entity and the value assigned. Rather than creating a Price Filter for each discount percentage, it is based on a field from the entity and can easily be changed in Acumatica/Dynamics GP without having to maintain it in RPM.
The steps in this article are specific to customer discounts, follow the same steps if you want to use markups for your pricing. These same steps also apply to Item Attributes.
More Information
When setting up pricing in RPM, you can use values from an entity to further define pricing. The attributes from those entities, combined with other Pricing Filters and Price Calculations, provides an automated and powerful price generation process. For example, a company offers a discount amount that varies by each customer. During the implementation, these attributes are assigned to the Customers. Going forward, changes made in the Acumatica/Dynamics GP related to the values for those attributes are captured in RPM. This makes it easy to maintain your pricing without having to go into RPM and updating the price information.
The Use Value from Entity option may be used with the following entities.
- Attribute Map
- Customer Attribute
- Document Attrubute
- Item Attribute
- Price Book (Price Sheet Detail – Amount)
The following steps detail how to create a single Price Calculation with the “Use Value from Entity” option in RPM to accomplish unique discounts for 2 different customers.
Note: The steps here include how to create a new Customer Attribute, but this is for testing purposes. Typically, the Customer Attribute is included from the ERP during the implementation.
Create Customer Attribute
- In RPM, open Customer Attributes from the Acumatica/Dynamics GP Data menu.
- Click Add New.
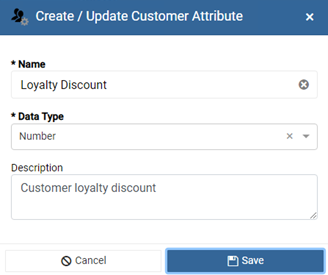
- Enter a Name and Description to specify the Customer Attribute.
- Select a Data Type of Number.
- Click Save.
Assign to Customer
- Open Customers from the Acumatica/Dynamics GP Data menu.
- Select a Customer and click Edit.
- Click Add New from the Customer Attribute Values grid.
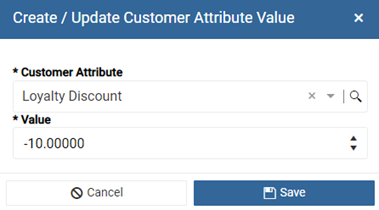
- From the Customer Attribute lookup, select Loyalty Discount.
- Enter -10 as the Value.
- Click Save.
- Click Customers from the Acumatica/Dynamics GP Data menu to see the list again.
- Select a different Customer and click Edit.
- Click Add New from the Customer Attribute Values grid.
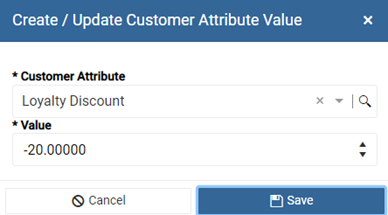
- From the Customer Attribute lookup, select Loyalty Discount.
- Enter -20 as the Value.
- Click Save.
Create Price Calculation
- Open Price Calculations from the Pricing menu.
- Click Add New.
- Enter a Name for the Price Calculation.
- Select Percent Adjustment as the Price Mode option.
- Mark the Modify Unit Price checkbox.
- Mark Use Value from Entity checkbox.
- Select Customer as the Entity.
- Select Loyalty Discount as the Customer Attribute.
- Click Save & Close.
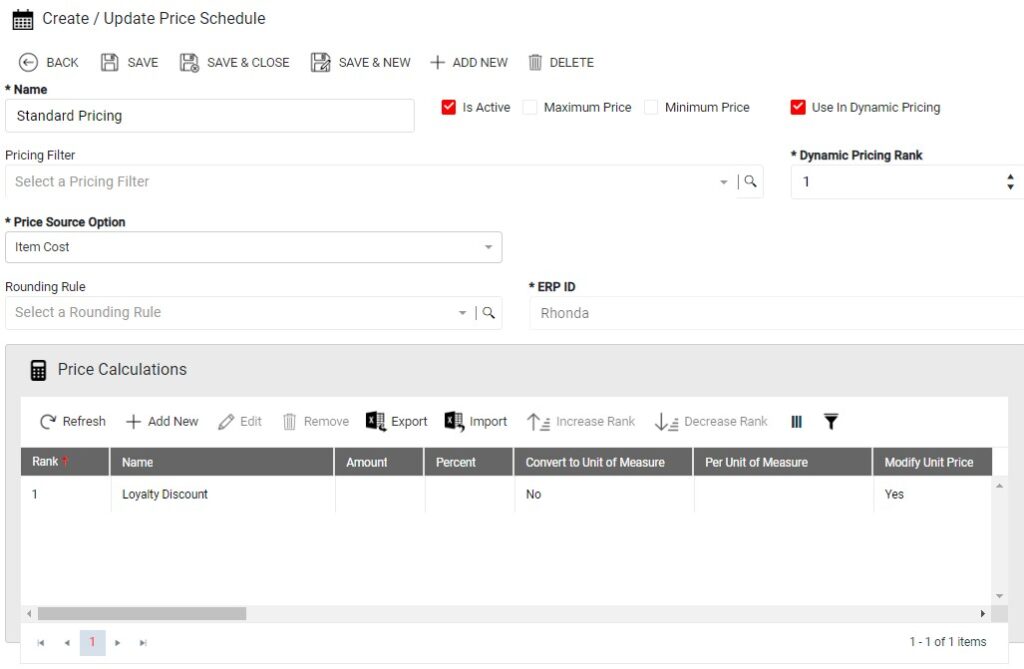
Assign to Price Schedule
- Open Price Schedules from the Pricing menu.
- Click Add New.
- Enter a Name for the Price Schedule.
- Mark Is Active checkbox.
- Select Item Cost as the Price Source Option.
- Click Save.
- Click Add New from the Price Calculations grid.
- Highlight Loyalty Discount and click Select.
- Click Save & Close to close Price Schedules.
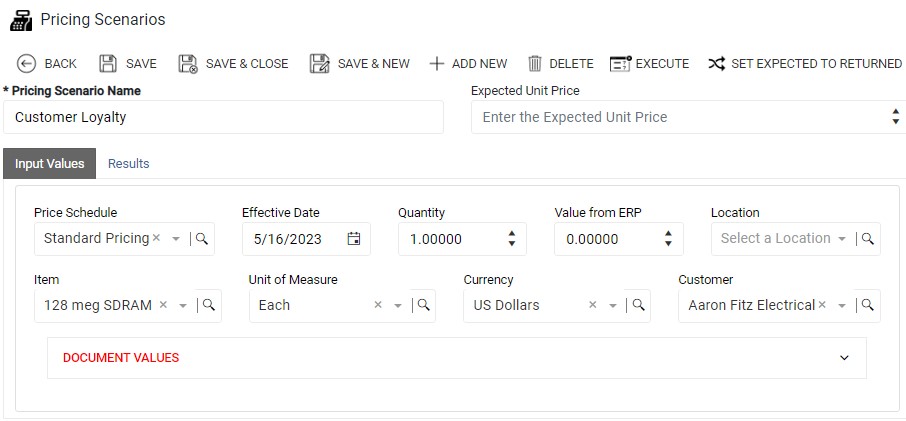
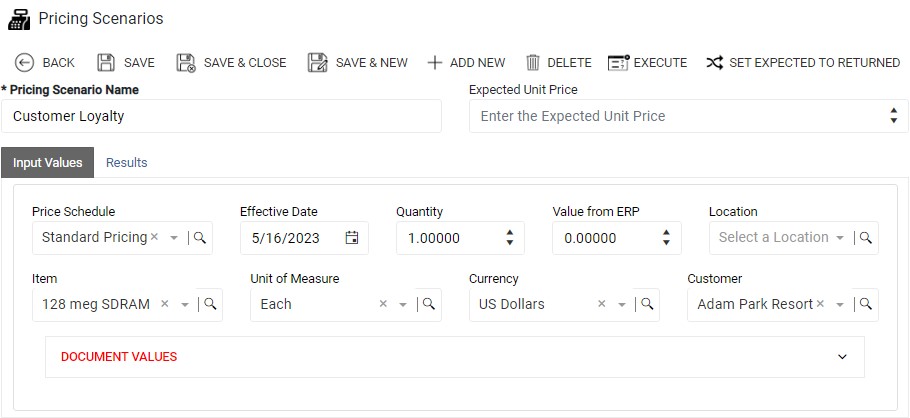
Pricing Test Scenario
- Open Pricing Scenarios from the Tools menu to run a pricing test within RPM.
- Click Add New.
- Make the following selections
- Item Cost w/ Cust Discount as the Price Schedule.
- Item.
- Unit of Measure.
- Currency
- Select the Customer from step 7.
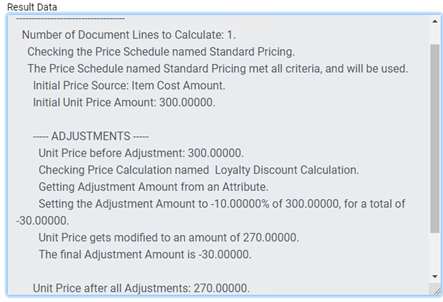
- Click Execute.
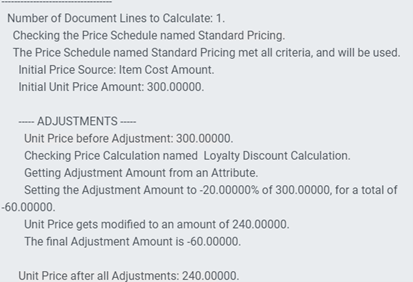
- On the Results tab, click View Diagnostics and see the item price calculation, along with the customer discount.
- Still in Pricing Scenarios, click Input Values tab.
- Use the Customer lookup and select the Customer from step 13.
- Select Item Cost w/ Cust Discount as the Price Schedule.
- Click Execute.
- On the Results tab, click View Diagnostics and see the item price calculation, along with the customer discount.