

Subject
The steps here explain how to setup and use Document Attributes as part of a Price Calculation in Rockton Pricing Management (RPM) and Dynamics GP.
Resolution
In this example, we use the Site ID from the Sales Transaction to include a shipping cost, which automatically calculates into the transaction unit price. Additionally, when the default site ID is WAREHOUSE, a fee of $5.50 is added to the transaction.
To steps on configuring Document Attributes for Site ID in RPM and Dynamics GP, see Method 2 in the knowledge base article How to create a Document Attribute in Dynamics GP to be used in a Price Calculation together with RPM.
Once you have configured the Document Attribute in RPM and in Dynamics GP, proceed with the following steps so that when you enter transactions in Dynamics GP, the Price Adjustment calculates.
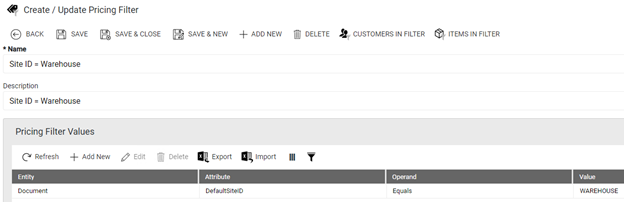
Create Pricing Filter
- In RPM, click Pricing Filters from the Pricing menu.
- Click Add New.
- Enter Site ID=Warehouse as the Pricing Filter Name.
- Enter a Description, if desired.
- Click Save.
- Click Add New from the Pricing Filter Values grid.
- Select Document from the Entity drop-down.
- Select DefaultSiteID from the Document Attribute lookup.
- Select Equals as the Operand.
- Enter WAREHOUSE as the Value.
- Click Save.
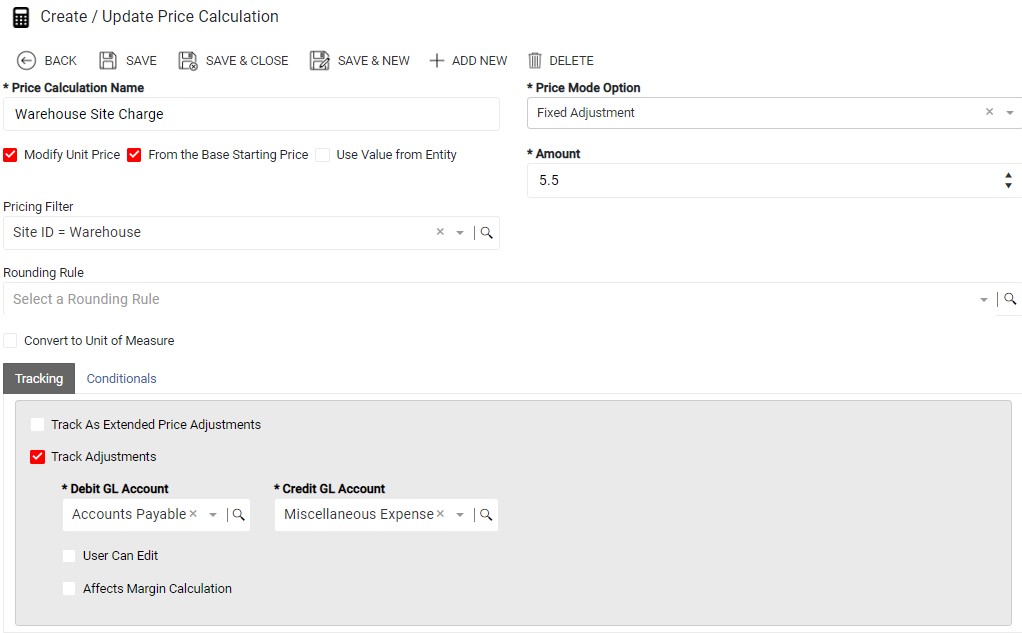
Create Price Calculation
- In RPM, click Price Calculations from the Pricing menu.
- Click Add New.
- Enter Warehouse Site Charge as the Price Calculation Name.
- Select Fixed Adjustment as the Price Mode Option.
- Enter 5.50 in the Amount field.
- Mark the Modify Unit Price checkbox.
- Mark the From Base Starting Price checkbox.
- Select Site ID = Warehouse from the Pricing Filter lookup.
- Mark the Track Adjustments checkbox, if desired.
- Select a Debit and Credit GL Account from the lookup.
- Click Save.
Update Price Schedule
- In RPM, click Price Schedules from the Pricing menu.
- Select the appropriate Price Schedule and click Edit.
- Click Add New from the Price Calculations grid on the Price Schedule.
- Select Warehouse Site Charge and click Select.
- Click Save & Close.
Enter Sales Transaction
With setup complete, you can process a Sales Transaction in Dynamics GP with RPM. The Site Charge for “Warehouse” is included whenever the Default Side ID on an Invoice is designated as WAREHOUSE. Below are the steps to verify the calculation takes place as intended.
- In Dynamics GP, go to Transactions | Sales | Sales Transaction Entry.
- Create an Invoice for AARONFIT0001 and tab through the header information. Validate WAREHOUSE is the Default Site ID.
- Add an invoice line for Item 128SDRAM, qty 1.
- Click Additional and then select RPM – Sales Line Details from the Sales Transaction Entry header. You will observe an adjustment of $5.50 has been included as a Warehouse Site Charge.
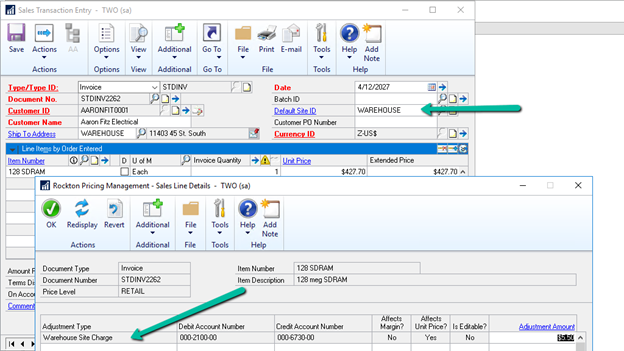
- Click OK to close the Rockton Pricing Management – Sales Line Details window.
- Change the Default Site ID to WC1.
- Click Additional and then click RPM – Recalculate Trx.
- Click Yes when prompted a Recalculate will occur. Notice the price has now changed.
- Click Additional and then click RPM – Sales Line Details again. Notice no adjustment appears since the Default Site ID is no longer WAREHOUSE.
- Click OK to close the Rockton Pricing Management – Sales Line Details window.
- From Actions, click Delete.
- Click Delete when confirming to delete the record.