

Subject
The steps here explain how to create a Document Attribute in Dynamics GP that can then be used as part of a Price Calculation in Rockton Pricing Management (RPM) and Dynamics GP.
Resolution
Document Attributes in RPM are a powerful feature that can provide flexibility in pricing with Dynamics GP. You can setup a Document Attribute using most fields within a Sales Quote, Order, or Invoice in Dynamics GP. The Price Calculation then calculates dynamically based on the information in that field.
To create a Document Attribute, first create the Document Attribute in GP and then create the Document Attribute in RPM to link them together. There are two ways to do this.
Option 1
Select from a list of fields.
- In RPM, expand the ERP Data menu.
- Select Document Attributes.
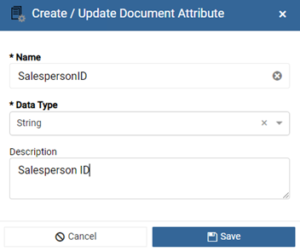
- Click Add New.
- Enter SalespersonID as the Name.
- Select String as the Data Type.
- Enter Description, if desired.
- Click Save.
- In Dynamics GP, select Document Attributes Setup from the Rockton Pricing Management shortcut menu.
- Click +, and then click Select from a list of fields from Document Attributes Setup.
- Type Salesperson in the Search field and then Tab off of the field..
- Select the Salesperson ID field for the Sales Transaction Entry window.
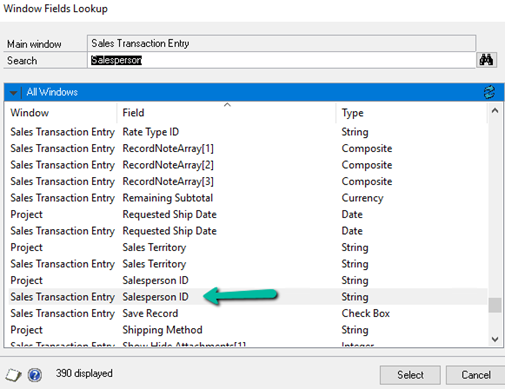
- Click Select.
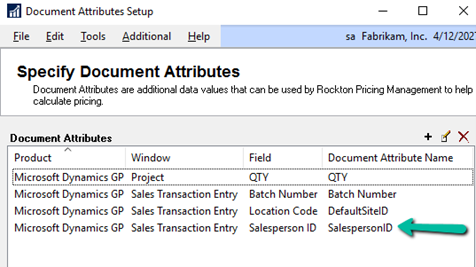
- Enter SalespersonID to match what was entered in RPM, and then click OK.
- A Document Attribute link appears in the Document Attributes Setup grid.
Option 2
- In RPM, expand the ERP Data menu.
- Select Document Attributes from ERP Data menu.
- Click Add New.
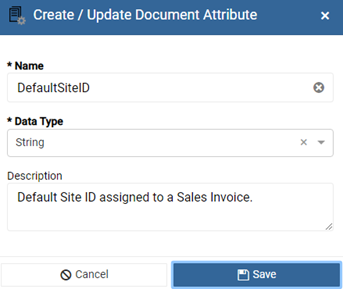
- Enter DefaultSiteID as the Name.
- Select String as the Data Type.
- Enter Description, if desired.
- Click Save.
- In Dynamics GP, select Document Attributes Setup from the Rockton Pricing Management menu.
- Click +, and then select Choose from Sales Transaction Entry window from Document Attributes Setup. Note: If you know the field you want, you can choose “Select from a List of fields” here instead.
- Review the message about moving cursor to the field you wish to assign as Document Attribute and then click OK.
- In the Sales Transaction Entry window, place your cursor into whatever defaulted into the Default Side ID field.
- Notice the field and window name automatically populates at the bottom of the Document Attributes Setup page.

- Click Add.
- Enter DefaultSiteID, as this is the name of the Document Attribute created in RPM.
- Click OK.
- A Document Attribute link appears in the Document Attributes Setup grid

- Click OK.
- When prompted, click Delete to delete that sample Sales Transaction.
More Information
To learn how a Document Attribute can be used to with Price Filters and Price Calculations to produce price adjustments on a transaction line, see KB article How to setup and use Document Attributes in a Price Calculation with RPM and Dynamics GP.