

Subject:
The steps here describe how to create a SmartFill Object for RM Open documents and to be able to search on the Customer PO Number when applying Cash Receipts.
Information:
The steps are as follows:
Create the SmartFill Object:
- Go to Microsoft Dynamics GP | Tools | Setup | SmartFill | Objects.
- Click the New Object button.
- Enter an Object Name. For example, RM Open Documents.
- Change the Search Type to Contains.
- In the Object Definition section, select the following:
- Product: Microsoft Dynamics GP
- Lookup Form: RM_Open_Lookup
- Table Name: RM_Open
- Return Field: Document Number
- Return Datatype: String
- In the Lookup Field section, select the following:
- Table: RM_OPEN, Field Name: Document Number, and then mark both the Search and Display checkboxes.
- Table: RM_OPEN, Field Name: Customer Number, and then mark the Display checkbox.
- Table: RM_OPEN, Field Name: Customer Purchase Order Number, and then mark both the Search and Display checkboxes.
- Click Save.
Create the Repository record for the window and field you want the SmartFill Object to work for:
- In the SmartFill Objects window, select the new object you created, and then click the Edit Object button.
- Click Repository.
- In the Repository Maintenance window, click the New button.
- In the Lookup Creation Wizard, click Next.
- Select the new object you created, and then click Next.
- Go to Transactions | Sales | Apply Sales Documents.
- Select a Customer ID using the Customer ID lookup (you may need to click it a couple times).
- Select a Document No. using the Document No. lookup (you may need to click it a couple times).
- Click the Find button (you may need to click it a couple times).
- Put your cursor in the Document Number field (you may need to click it a couple times).
- In the Add New Lookup for (the name of your SmartFill Object) window, you should see the following:
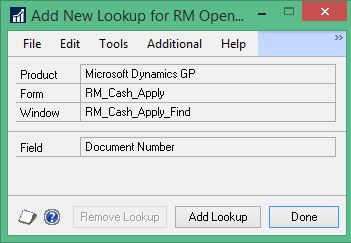
- If you do, click Add Lookup, and then click Done.
- Close the Repository Maintenance window.
- Now you can test out the new lookup you created. To do this, please follow these steps:
- Go to Transactions | Sales | Apply Sales Documents.
- Select a Customer ID using the Customer ID lookup.
- Select a Document No. using the Document No. lookup.
- Click the Find button.
- Put your cursor in the Document Number field and enter part of the Customer PO Number.
- If only one result is found, it will enter the Invoice Number in the field. Then you can click Find and it will be the first invoice listed in the scrolling area.
- If more than one results if found, the Make a Selection window will open and you can select the correct Invoice.