Setting up pricing for your items is never fun. There always seems to be some catch-22 for different customers or specific items. With Rockton Pricing Management (RPM), we make sure you have the flexibility you need to accomplish the most complex pricing. This is done through Price Schedules.
Price Schedules
A Price Schedule in RPM is what drives your pricing when you add an item on a transaction. The pricing can be based on so many different options and adjustments. It’s what makes pricing so flexible in RPM! Let’s go through setting up a Price Schedule.
The first thing to note about a Price Schedule is that it ties to the Customer Price List in Acumatica. They have the same name. The Price Schedule name already exists in RPM as it is added during the implementation process. All you need to do is to define the setup the way you want.
- Navigate to Price Schedules under the Pricing menu and open the Price Schedule you wish to set up.
- Add a Pricing Filter if you want this Price Schedule to only be used for specific records, such as Items or Customers. If no Pricing Filter is added, the Price Schedule is used for everything.
- Select the Price Source Option you wish to use. They are as follows:
-
- Another Price Schedule – The price originates from another Price Schedule. This allows you to stack your Price Schedules.
- Item List Price – The List Price for the Item from the ERP system.
- Item Cost – The last cost associated with the Item from the ERP system.
- Price Book – Uses a specific price from a Price Book. Price Books are great when you need date-driven pricing.
- Value from ERP – Uses the value from the transaction to calculate the price.
- You can also add a Rounding Rule to the Price Schedule. This way you can round the dollar amount up or down, do increments of 5, whatever you need.
- Lastly, add any Price Calculations you want. These Price Calculations can affect the Base Price such as a fee or a discount or simply be an added calculation such as margins or rebates.
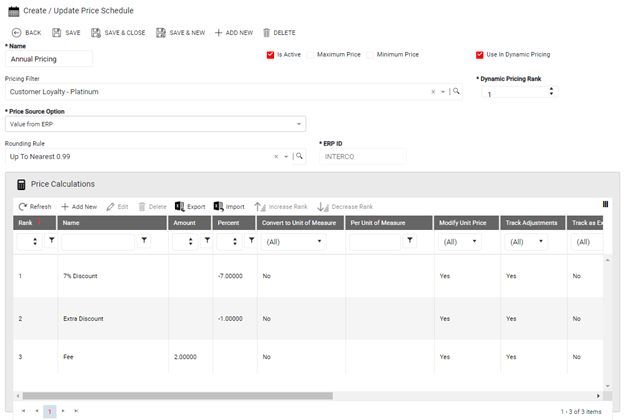
After your Price Schedule is set up the way you want, mark the Is Active check box.
Pricing Scenario
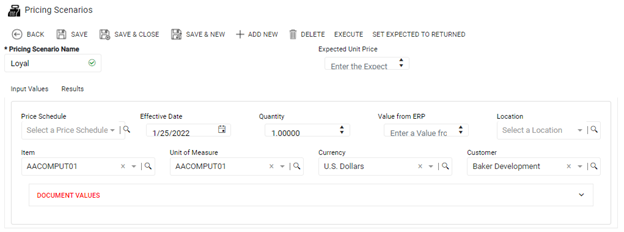
Now that your Price Schedule is created, you can test your pricing to verify your results. This is done through a Pricing Scenario. A Pricing Scenario allows you to see what price is calculated for a specific scenario without having to create a transaction. To run a Pricing Scenario, follow these steps.
- Navigate to Pricing Scenarios under the Pricing
- Enter a Pricing Scenario name and enter the necessary information.
- Click Execute to get the results.
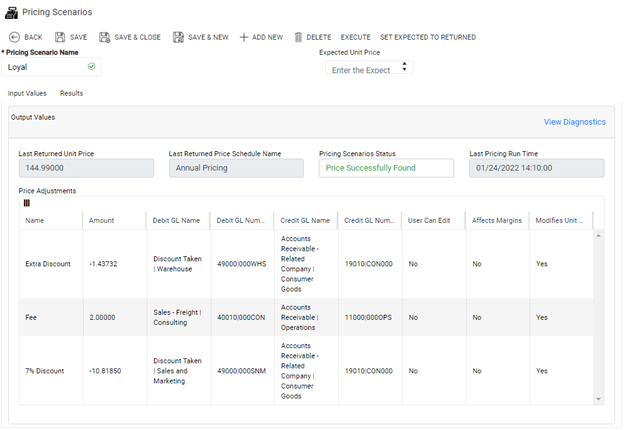
Verify the results you received are what you expect. If it’s not, you can click the View Diagnostics option to see how RPM calculated the price. This makes troubleshooting so much easier!
Also, with Pricing Scenarios, you can save them so they may be used again and again rather than having to enter the information each time.
While Acumatica allows you to create your pricing and apply that pricing to transactions correctly, you are a bit limited on what you can do. RPM gives you the flexibility to easily set up your pricing, even if it is complex.
If you would like more information on RPM or want to see a demo, contact us at sales@rocktonsoftware.com.