
A couple of years ago I wrote a blog called, Give a Support Team a Script Log in Microsoft Dynamics GP. That blog outlined three methods for how to help your support technician help you troubleshoot your problem by providing them with the best script log. Since that blog was published, Rockton Software has added a new window to our products which further simplifies the process of creating a script log using two of the three methods mentioned in that original article.
A refresher
There are many types of log files, such as DexSQL logs, SQL Profiler trace files, and Windows Event logs, and they all contain different types of information. Sometimes one log is appropriate when another is not. Your support technician will let you know which type of log is needed.
A script log is a text file that lists all of the procedure calls that are being executed as the software runs inside of Dynamics GP. This can be invaluable to a developer who may get called in on tough cases, because she or he can compare the calls in this script log to the calls in their program source code. This will likely allow them to determine, with quite a bit of precision, what the program is doing behind the scenes.
Creating the best script log
The general idea in creating an efficient script log is that you want the log file to be as small as possible. At first, this may seem counterintuitive; after all, why not give as much information as you can? The reason is that these logs generate lots and lots and lots of data. If you can narrow down the log so that it contains just the activity that causes the error to occur, then you will save your support technician from having to slog through pages and pages just to find where to start looking. For this reason, there are three very important things to keep in mind when creating your log file:
- Begin logging at the last possible moment before the error occurs.
- While logging is active, perform the fewest possible actions necessary to make the error happen.
- Turn off logging as soon as possible after the error occurs, without doing anything more than is absolutely necessary in the application.
Following the above guidelines will, in most cases, give the support technician exactly what they need to quickly isolate where in the software the error is occurring.
Creating a script log from Rockton Software products
Two methods for creating a script log that I described in my original blog post (The built-in script logger and Starting script logging from the login) have been simplified and improved upon by means of the Enable or Disable Script Logging window.
The Enable or Disable Script Logging window can be found in the latest builds of our Dynamics GP Toolbox and SmartFill products. At the time of writing this blog, we are finishing up a release of our Omni Price product which will also include it. The next time we release Auditor and Dynamics Report Manager, you will see it in those products as well.
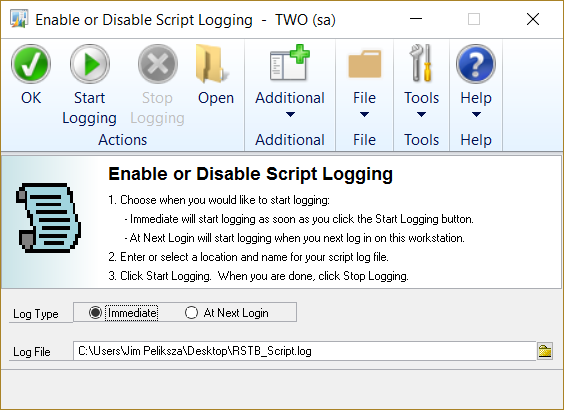
You can access this window by first opening the Setup window of one of our products, then clicking on the Troubleshooting tab. Click on the option labeled, “Enable or Disable Script Logging”, which you will see near the bottom of the list.
So, what are the benefits of this new window? Read on!
Immediate script logging
Follow these steps when you need to start logging at some point after you have logged in:
Open this window and have it off to the side so you can use it when the time is right.- Perform whatever actions you need to perform to recreate the error, not including that final step that causes the error to occur. Keep in mind the three crucial steps in the Creating the best script log section, above.
- On the Enable or Disable Script Logging window, choose Immediate for Log Type.
- Enter or browse to a path and filename to use for your script log.
- Click the Start Logging button.
At this point, everything that you do in Dynamics GP will be logged to the file that you specified in step five. This is why you should not start logging until the latest possible point before the error occurs. Of course, if the support technician gives you specific instructions for where to begin logging, then follow those instructions. But in the absence of that, you should try to start logging as late as possible.
Once the error occurs, and you have captured everything that you need to capture, click the Stop Logging button, which will now be enabled. In some cases, you may not be able to choose this option because there is some error message or other dialog that is requiring you to respond to it. Go ahead and respond. Then turn off script logging at the earliest opportunity. Again, the objective is to put as little as possible in the log file, so don’t do anything that’s not absolutely necessary before you stop script logging.
![]()
It is a good idea to keep good notes for everything you did and what happened while script logging was active. This will also help your support technician understand what they will be seeing in the log that you are sending them.
As you can see, this process is much easier than updating the Dex.ini and logging out of and into Dynamics GP. It also does not involve adding that Debug menu, which would possibly be confusing to other users in a Citrix or Terminal Server environment.
Starting script logging from the login
If your situation requires you to start logging during the login process, you can use this same window to do that. Follow these instructions:
- Open this window and choose At Next Login for Log Type.
- Enter or browse to a path and filename to use for your script log.
- Click the Start Logging button.
- You will see a message telling you that logging will start the next time you log in to Dynamics GP.
- Exit Dynamics GP, then log back in again.
For this next login only, the script log file you specified will automatically be created in the specified folder. To turn off script logging, you can do any of the following:
- Choose Disable Script Logging from the product’s Setup menu
- Press Ctrl + Alt + Shift + D.
- Open the Enable or Disable Script Logging window and click the Stop Logging button.
Using this method allows you to specify the filename and location to use for your script log file.
We want your feedback!
Please let us know if we can clear up anything that might be confusing or if you have any other information that would be useful. And as always, if you have any suggestions for future blogs then please, suggest away!