

Do you want to offer multiple discounts, but not sure how to calculate the price? Do you want to add a fee on top of that? What if you want to track margins or rebates or royalties? Plus, you want all of them to track to their own specific financial account without having to manually go in and adjust those accounts. Rockton Pricing Management (RPM) can do that work for you. Set it up once, and your part is done.
When you use RPM, you can set up as many Price Calculations, or discounts, as you need to adjust the price of your items. A Price Calculation adjusts the price based on whether you want to increase or decrease the price or not affect the price at all. The best thing though, is that each of these calculations can be assigned their own GL account.
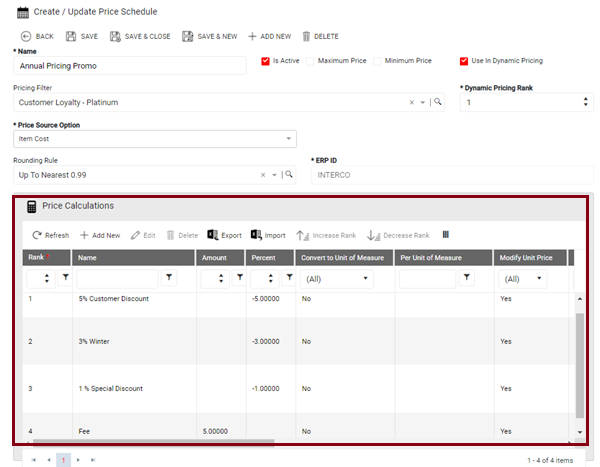
For example, say you need to show three separate discounts plus a packaging fee for an item. To calculate multiple discounts, you would have the following Price Calculations created.
- 5% Customer Discount
- 3% Winter Sale Discount
- 1% Special Item Discount
- $5 Packaging Fee
So, How Do You Calculate Multiple Discounts Using Multiple GL Accounts?
Let’s go through the setup of a Price Calculation.
- Under the Pricing menu, open Price Calculations and click Add New.
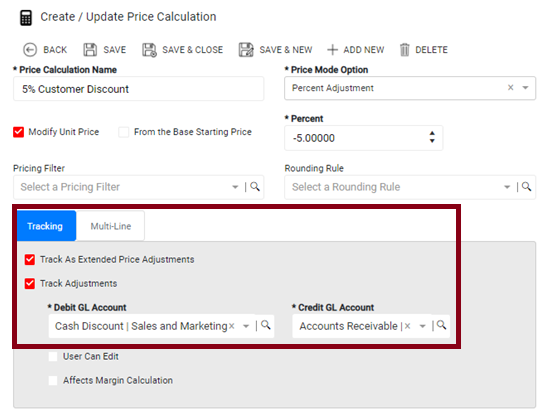
- Enter a specific Price Calculation Name. Make sure it is descriptive, so you know what the Price Calculation is used for on the Price Schedule.
- Select a Price Mode Option. In this example, use Percent Adjustment.
- Mark Modify Unit Price. This means the Price Calculation changes the Unit Price by the amount calculated.
Note: If you have more than one Price Calculation you can mark From the Base Unit Price if you want each calculation to calculate from the Base Unit Price. If unmarked, each Price Calculation calculates based on the last calculated price.
- In the Percent field, enter the Percent Discount. In this example, enter -5.
- Click the Tracking tab and mark the Track Adjustments check box. This tells RPM to add the line in Acumatica.
- Select the Debit and Credit GL Accounts where you want the discount to post.
- Save and close the screen.
The Price Calculation should look like this screenshot. Note the Tracking section.
When you create a Price Calculation for the fee, follow the same steps, except select Fixed Adjustment for the Price Mode Option. You are then able to enter the amount of the fee.
After all the Price Calculations are created and the appropriate GL accounts are assigned, add the Price Calculations to the Price Schedule.
Now that the Price Calculations are created and assigned to the Price Schedule, all you need to do is enter transactions in Acumatica. As the transactions are entered, Acumatica and RPM work together seamlessly to calculate the price and make those adjustments to the financial accounts.
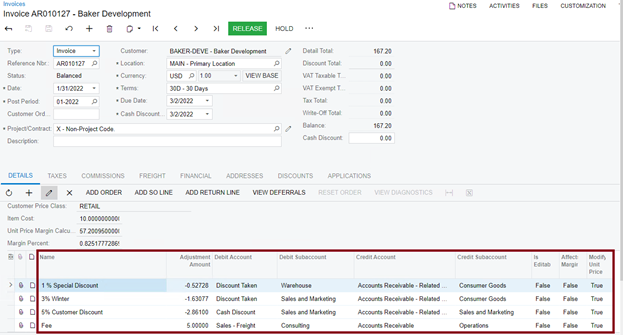
In this example, the financial accounts are not editable, however, in RPM you have the option to make these lines editable. This allows you the ability to change the accounts and amounts used on the transaction. It’s another way RPM offers flexibility to meet your pricing needs.
Making adjustments to your pricing, even having to calculate multiple discounts, is easy and super flexible in RPM. Simply set the financial account on the Price Calculation and forget it.
If you would like more information on RPM or would like to see a demo, contact us at sales@rocktonsoftware.com or call 877-4ROCKTON.