Issue:
You need to import Contract pricing information into Omni Price and want to know the methods that can be used.
Recommendations:
There are different methods that can be used to import Contract pricing information into Omni Price.
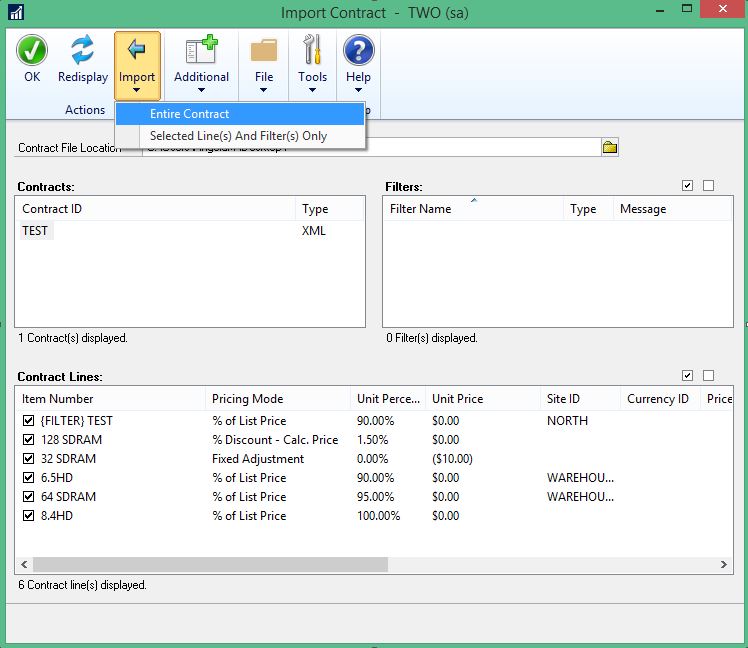
1. Contract Import – Entire Contract
2. Contract Import – Selected Line(s) and Filter(s) Only
3. Excel Import
4. Table Import
More information is included on each Import below.
Be sure you have full, fresh backups made before going through any troubleshooting steps!
1. Contract Import – EntIre Contract
All of the contract information, including all of the Contract Lines and Filters displayed, will be imported. Note that the selected Contract must not already exist on file.
a. To open the Contract Maintenance window, go to Cards | Omni Price | Contract.
b. This is a good method to use if you only have a handful of Contracts to import.
c. Click Actions and select Import Contract.
d. In the Contracts list, select the Contract you would like to import.
e. Click Import, and then click Entire Contract.
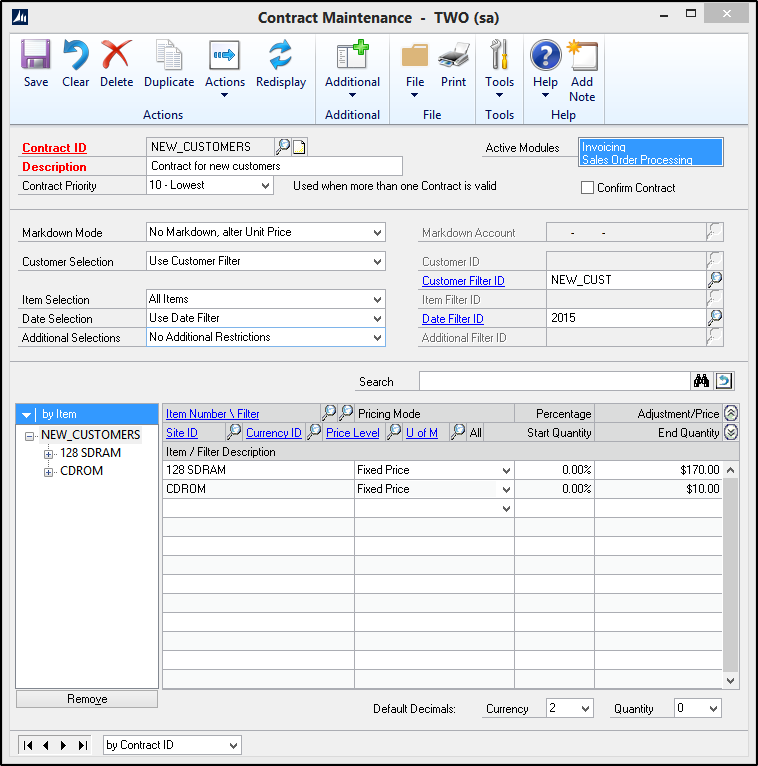
2. Contract Import – Selected Line(s) and Filter(s) Only
Only the marked Contract lines and Filters will be imported. Contract Lines will be added to the Contract ID that is displayed on the Contract Maintenance window.
a. To open the Contract Maintenance window, go to Cards | Omni Price | Contract.
b. This is a good method to use if you only have a handful of Contracts to import.
c. You will need to manually create the Contract Header, which is seen below, for each Contract to be imported.
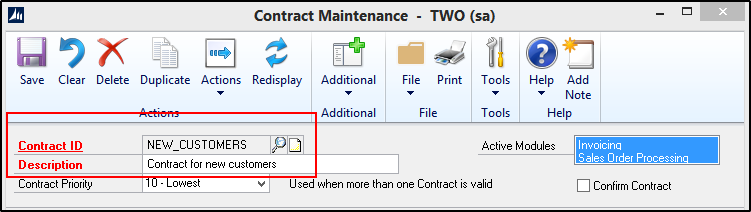
d. Click Save.
e. Pull up the newly created Contract Header.
f. Click Actions and select Import Contract.
g. In the Contracts list, select the Contract which contains the desired Contract Lines.
h. Then, mark the checkboxes for the Contract Lines.
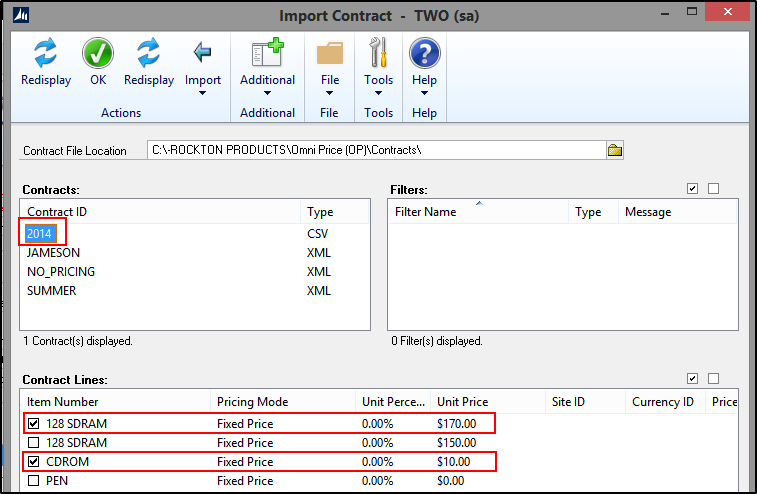
i. Click Import and select Selected Line(s) and Filter(s) Only.
j. You will be prompted to print the Omni Price Contract Import Report, if needed.
k. Once the import completes, click OK in the Import Contract window.
l. Your Contract now has Contract Lines, but may require the setup of Filters if they were used previously and were not able to be imported.
m. Click Save in the Contract Maintenance window.
3. Excel Import
An Excel Import is done by first creating a new Omni Price Contract in the Contract Maintenance window. Give it a Contract ID and Description. Then, export the Contract out to CSV format using the Excel Import/Export feature of Omni Price. You can find this by going to Tools | Utilities | Omni Price | Excel Import/Export.
Open the newly exported file in Excel. Once you are finished with getting your pricing into Excel, you would then import the Contract back into Omni Price by again going to Tools | Utilities | Omni Price | Excel Import/Export.
Here is an example:
- Go to Microsoft Dynamics GP | Tools | Utilities
| Omni Price | Excel Import / Export. - In the Import/Export Contracts using Excel
window, select the Contract you would like to export and make changes to. (This
is a great option to just make a backup of your Contract as well.) - In the Excel file location field, click the Browse
button to browse to the location you want to export a copy of the Contract,
enter the File Name with the .xls extension as seen in the screenshot, and then click Open.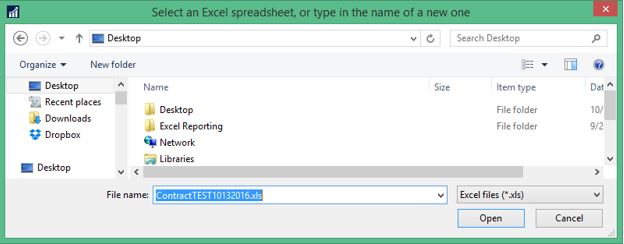
- In the Import/Export Contracts using Excel
window, click Export. - Browse to the location of the file, and then
open it. - Expand the TOQTY field so all the 9’s appear.
- Make the necessary changes. For example, update
the percentage, update the price, add items if necessary, etc., and then save
the file. - To import in the changed file, have everyone get
out of Sales Transactions, Invoicing Transactions, and Omni Price windows. - Then go to Microsoft Dynamics GP | Tools |
Utilities | Omni Price | Excel Import / Export. - In the Excel file location field, click the
Browse button to browse to the *.xls file, select it, and then click Open. - Click Import.
- In the Choose Import Replace Option window,
select one of the following options as appropriate for your situation: Replace
All, Delete, then Replace, or Add new records only (see screenshot).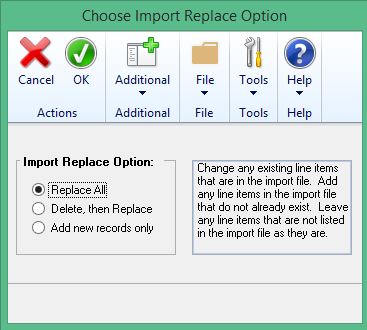
- Click OK.
4. Table Import
The Table Import can be used when importing in multiple contacts, for example, fifty or more. You would need to import in the Contract Header table, which is the WDC02101, and then use Excel Import to import all of the Contract Lines in.
To get to the Table Import go to Tools | Integrate | Table Import.
The following Microsoft KB article will provide more information on using the Table Import feature.
How to use Table Import to import data into Microsoft Dynamics GP (Article ID: 856667)
Note: If you are using filters, it will make the import process more difficult.