Subject:
PopUps are used to display information to the Users through global notes, personal notes, and tips. Below are the steps on how to enable, setup, and utilize PopUps in Microsoft Dynamics GP.
Information:
These are the steps to follow:
Enable PopUps
Here are the steps on how to enable PopUps:
1. Log into Dynamics GP as sa, a POWERUSER, or a Dynamics GP Toolbox Admin user.
2. Go to Microsoft Dynamics GP | Tools | Setup | Dynamics GP Toolbox | Dynamics GP Toolbox System Settings.
3. Double click PopUps.
4. Mark the following checkboxes:
a. Enable PopUps
b. Enable MyNotes
c. Enable Object PopUps
5. In the Show drop-down list, select All Users.
6. Mark sa and any other Users that you want to be System Administrators for PopUps.
7. Click OK.
Note PopUp
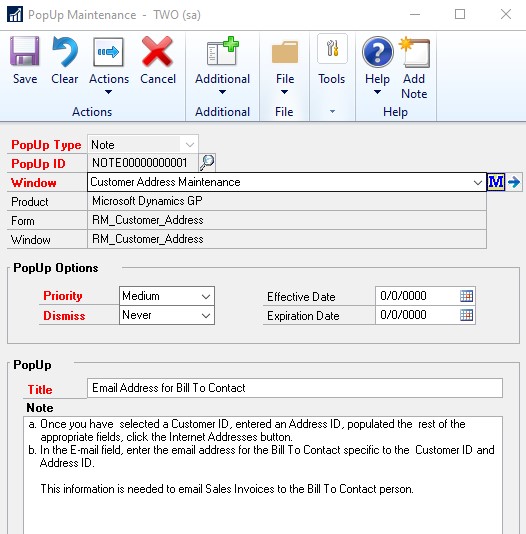
A Note PopUp is created for multiple Users who access a specific window. In this example, we will create a Note for all Users who access the Customer Address Maintenance window alerting them to add the email address for the Customer’s Bill To Contact person.
1. Go to Microsoft Dynamics GP | Tools | Setup | Dynamics GP Toolbox | PopUp Maintenance.
2. In the PopUp Type field, select Note.
3. Tab through to the Window field and enter the Window name or part of the window name such as Customer Address, and then tab off.
Note: If the window selected is not the right one, click the drop-down area, find and select the correct window name.
5. Select or enter the appropriate PopUp Options.
a. Priority: This will dictate which Notes are shown first.
b. Dismiss: This will determine whether the User can dismiss the Note permanently, until the next day, or not at all.
c. Effective Date and Expiration Date: These fields are not required. If they are not entered, then the Note is effective immediately and it never expires.
6. Enter a Title. This is what appears as the Title in the Notes section of the Dynamics GP Toolbox PopUp window. For example, Enter Email Address for Bill To
Contact.
7. Enter a Note to provide more details, instructions, etc. This will appear in the Note’s detail section of the Dynamics GP Toolbox PopUp window. For example:
a. Once you have selected a Customer ID, entered an Address ID, populated the rest of the appropriate fields, click the Internet Addresses button.
b. In the E-mail field, enter the email address for the Bill To Contact specific to the Customer ID and Address ID.
This information is needed to email Sales Invoices to the Bill To Contact person.
9. Click OK.
10. Click Save.
1. Using the above example, go to Cards | Sales | Addresses.
2. The ‘Enter Email Address for Bill to Contact Note’ PopUp will appear.
3. If there is more than one Note for the window, use the scrolling arrows to see the next one.

MyNote PopUp
A MyNote PopUp is created by each User in the system who would like to personalize a note for the window(s) they work with. In this example, we will create a MyNote for the Employee Maintenance window to remind me to contact the Department Administrators and find out the new Employee’s Adjusted Hired Date.
1. Go to Microsoft Dynamics GP | Tools | Setup | Dynamics GP Toolbox | MyNote Maintenance.
2. In the Window field, enter the name of the window for which you would like the MyNote to appear. For example, type Employee Maintenance, and then tab
off the field.
Note: You can click the drop-down button to see other windows available that have the words, Employee Maintenance, in them.
3. Select or enter the appropriate PopUp Options.
a. Priority: This will dictate which MyNotes are shown first.
b. Dismiss: This will determine whether the User can dismiss the MyNote permanently, until the next day, or not at all.
c. Effective Date and Expiration Date: These fields are not required. If they are not entered, then the MyNote is effective immediately and it never expires.
4. Enter a Title. This is what appears as the Title in the MyNotes section of the Dynamics GP Toolbox PopUp window. For example, Verify with Department Admin
on Adjusted Hire Date.
5. Enter a Note to provide more details, instructions, etc. This will appear in the MyNote’s detail section of the Dynamics GP Toolbox PopUp window. For example:
Accounting: Susie
Marketing: Tom
HR: Edward
IT: Mary
Sales: Leo
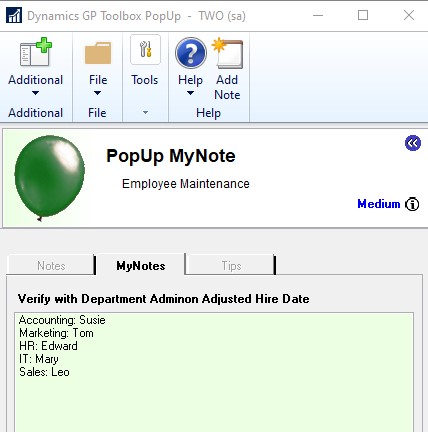
How a MyNote PopUp works:
1. Go to Cards | Payroll | Employee.
2. The Verify with Department Admin on Adjusted Hired Date MyNote PopUp appears.
3. If there is more than one MyNote for the window, use the scrolling arrows to see the next one.
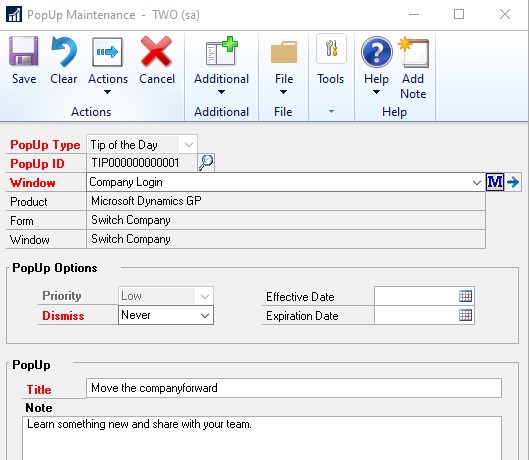
Creating a Tip of the Day:
A Tip of the Day is used to provide your Users with tips that are informational, inspirational, etc. In this example, we will create a Tip of the Day for the Company Login window.
1. Go to Microsoft Dynamics GP | Tools | Setup | Dynamics GP Toolbox | PopUp Maintenance.
2. In the PopUp Type field, select Tip of the Day.
3. Tab through to the Window field and enter the Window name or part of the window name such as Company Login, then tab off.
Note: If the window selected is not the right one, click the dropdown area, find and select the correct window name.
5. Select or enter the appropriate PopUp Options.
a. Dismiss: This will determine whether the User can dismiss the Note permanently, until the next day, or not at all.
b. Effective Date and Expiration Date: These fields are not required. If they are not entered, then the Note is effective immediately and it never expires.
6. Enter a Title. This is what appears as the Title in the Tip of the Day section of the Dynamics GP Toolbox PopUp window. For example, Move the company
forward.
7. Enter a Note to provide more details, instructions, etc. This will appear in the Tip of the Day’s detail section of the Dynamics GP Toolbox PopUp window. For
example, Learn something new and share with your team.
8. Click Actions | User Access. Mark all of the Users or the specific Users you want the Note to appear for.
9. Click OK.
10. Click Save.
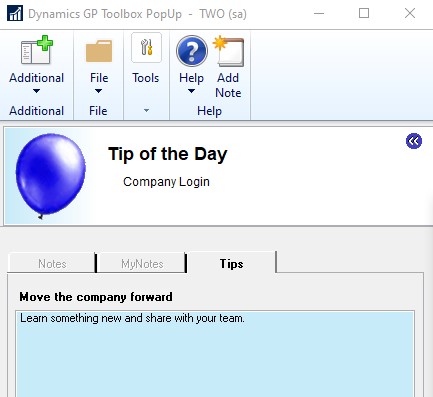
How a Tip of the Day PopUp works:
1. Click to log into Microsoft Dynamics GP.
2. At the Company Login screen, the ‘Move the company forward’ Tip of the Day PopUp appears.
Creating an Object PopUp:
An Object PopUp is used to have an object’s note appear if the object has a note attached to it. There are Object PopUps available for Accounts, Checkbooks, Customers, Employees, Items, and Vendors. In this example, we will add an Object PopUp for the Item Number and add a note that the Item Number is being discontinued and what Item Number to substitute it with.
1. Go to Microsoft Dynamics GP | Tools | Setup | Dynamics GP Toolbox | PopUp Object Note Setup.
2. Select the Object Name. In this example, we will select Items.
3. Click the + button to Add PopUp Object Note Setups.
4. In the Add PopUp Object Note Setups window, there are a couple of options.
a. You can choose to have the Object PopUp for all Items that have a Note attached to them.
i. For All Items to be marked, click the Mark All button.
ii. Click Add.
b. Or, you can choose to have the Item Object PopUp for specific Items.
i. Click the Field Value lookup.
ii. Select the Item Number.
iii. Mark the records for which specific items you want the Object PopUp to appear. You can Mark all of them or select the specific ones items.
iv. Click Add.
v. If you want the Object PopUp to appear for other Items, repeat the steps above.
How Object PopUps work:
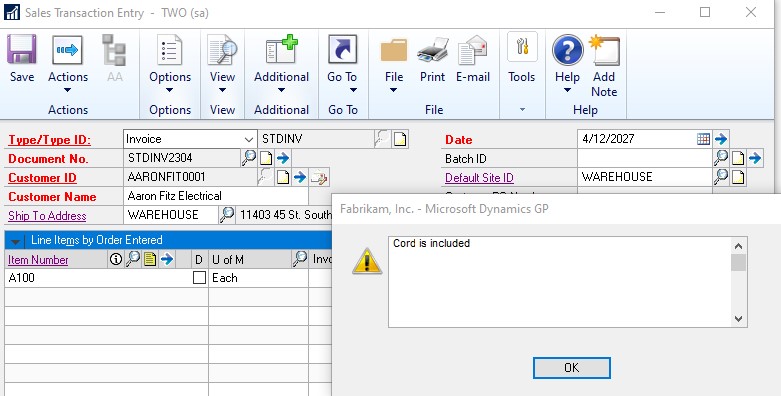
1. Go to Cards | Inventory | Item.
2. Select an Item Number. In this example, we will select A100.
3. Attach a Note to it. For example, Discontinued. Substitute item with: A100-18.
4. Click Attach.
5. Click Save.
6. Close the Item Maintenance window.
7. Go to Transactions | Sales | Sales Transaction Entry.
8. Populate the header information.
9. Then select A100 for the Item Number.
10. The following note will appear: